
Lightweight Social Buttons
Provide social buttons with (almost) no additional server load.
Provide social buttons with (almost) no additional server load.
Let’s first have a look at what else exists for providing social buttons:
Here we’ll take an approach using only features provided by Merchant’s Edition anyways. It requires a few lines of JavaScript, yet no loading of additional remote resources.
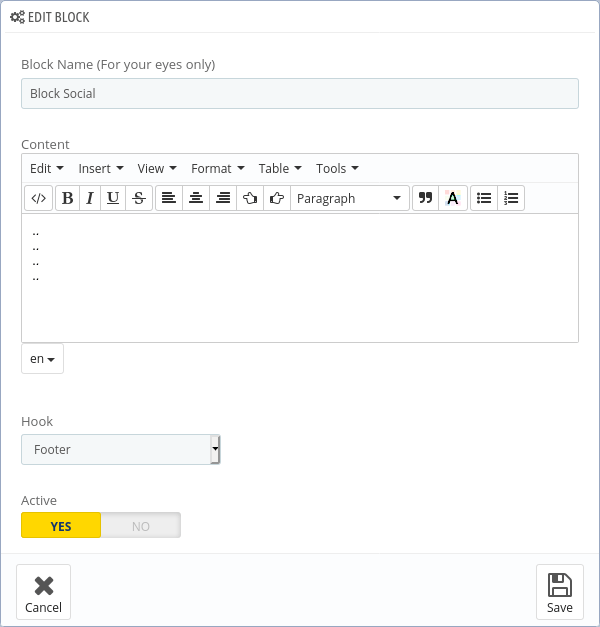
A fairly simple way to insert HTML into shop pages is to use module HTML Block, which comes with Merchant’s Edition by default:
</>.<div id="htmlblock-social">
<div class="facebook">
<a title="Share this on Facebook" role="button" target="_blank">
.<i class="icon-facebook">.</i>
</a>
</div>
<div class="twitter">
<a title="Share this on Twitter" role="button" target="_blank">
.<i class="icon-twitter">.</i>
</a>
</div>
<div class="pinterest">
<a title="Share this on Pinterest" role="button" target="_blank">
.<i class="icon-pinterest">.</i>
</a>
</div>
<div class="email">
<a title="Send this by Email" role="button">
.<i class="icon-envelope">.</i>
</a>
</div>
</div>
title= is subject for
translation, everything else should stay unchanged.At this point, the HTML block is sufficiently defined, ready for saving and should look like this:
If you think seeing just a couple of dots as content looks odd, please look up expert notes below.
In any case, save this block. This part is done.
Inserting CSS into shop pages is even easier:
#htmlblock-social {
  /* Fix buttons on the viewport, don't scroll them. */
  position: fixed;
  /* Where to place these buttons, from the top. */
  top: 35%;
  left: 0;
  /* Not much wider than a single button, to align them vertically. */
  width: 50px;
}
#htmlblock-social div {
  /* Size buttons and icons here. */
  width: 48px;
  transition: 0.2s;
  height: 48px;
  text-align: center;
  font-size: 25px;
  line-height: 48px;
}
#htmlblock-social div:hover, #htmlblock-social div:active {
  /* Highlight the button on hover by widening it. */
  width: 64px;
  transition: 0.2s;
}
#htmlblock-social div a {
  /* Hide these dots. */
  color: transparent;
}
#htmlblock-social div a:hover {
  /* Hide these dots on hover as well. */
  color: transparent;
}
#htmlblock-social div i::before {
  /* Icon color. */
  color: white;
}
#htmlblock-social .facebook {
  /* Facebook color as background for the facebook button. */
  background-color: rgb(59, 89, 152);
}
#htmlblock-social .twitter {
  /* Twitter color as background for ... */
  background-color: rgb(29, 161, 242);
}
#htmlblock-social .pinterest {
  background-color: rgb(203, 32, 39);
}
#htmlblock-social .email {
  background-color: rgb(132, 132, 132);
}
Inserting JavaScript into shop pages works the same way as inserting CSS:
/* Some code to extract relevant content from the current page. */
let htmlblockSocial = document.getElementById('htmlblock-social');
let htmlblockSocialURL = encodeURIComponent(document.location);
let htmlblockSocialTitle = encodeURIComponent(document.title);
let htmlblockSocialMedia = '';
let htmlblockSocialMetas = document.getElementsByTagName('meta');
for (let i = 0; i < htmlblockSocialMetas.length; i++) {
  if (htmlblockSocialMetas[i].getAttribute('property') === 'og:image') {
    htmlblockSocialMedia = htmlblockSocialMetas[i].getAttribute('content');
    break;
  }
}
htmlblockSocialMedia = encodeURIComponent(htmlblockSocialMedia);

/* Assemble links for each social network with this found content. */
htmlblockSocial.querySelector('.facebook a').href =
    'https://www.facebook.com/sharer/sharer.php'
    + '?u=' + htmlblockSocialURL;
htmlblockSocial.querySelector('.twitter a').href =
    'https://twitter.com/intent/tweet'
    + '?text=' + htmlblockSocialTitle
    + '&url=' + htmlblockSocialURL;
htmlblockSocial.querySelector('.pinterest a').href =
    'https://www.pinterest.de/pin/create/button/'
    + '?media=' + htmlblockSocialMedia
    + '&url=' + htmlblockSocialURL;
htmlblockSocial.querySelector('.email a').href =
    'mailto:'
    + '?subject=' + htmlblockSocialTitle
    + '&body=' + htmlblockSocialTitle + ':%20' + htmlblockSocialURL;

/* Move buttons right to the document root. Some themes require this. */
document.body.appendChild(htmlblockSocial);
Click Save on the Custom Code page.
That’s it.
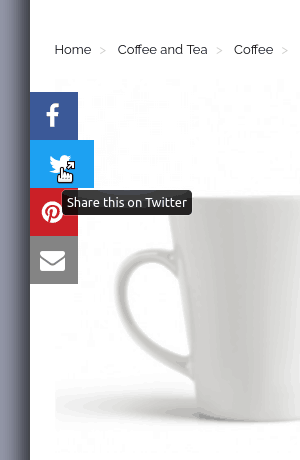
Do what a visitor would do: go to front office and load a page.
That’s how these buttons look with theme Niara:
Regarding the used HTML:
Why shows the rendered HTML just a couple of dots?
Well, there’s no need for HTML content. All visible content (icons) is provided by CSS.
Why are there dots anyways?
Without the right dot in each line, the HTML editor used by module HTML Block
would delete the entire <i> element. The left dot serves as counterweight,
keeping icons centered by CSS still centered.
Why to these <a> elements have no href?
As one can see in the given JavaScript, these hrefs get added there,
depending on page content. hrefs added in HTML would be overwritten.
Regarding the used JavaScript:
Why JavaScript at all?
Key here is to have links containing not generic stuff about the shop, but content actually related to the current page.
Troubleshooting:
Icons don’t show up at all!
These icons come with FontAwesome. Some themes define them not with CSS
classes like icon-twitter, but with classes like fa fa-twitter. Likewise
for the other social networks. Adjust classes in the custom CSS chunk
accordingly.
My favorite network isn’t there. How to add it?
Adding another network requires additions to all three sections, HTML, CSS and JavaScript. Easiest way is probably to duplicate each section of one of the provided networks, then to replace the network name and adjust link assembly in JavaScript. Good hints on link assembly are social generators like Share Link Creator. Authoritative for each network is their developer documentation, of course.
Research for this strategy was paid by Librarie Z Bookstore. Thank you very much!